.png)
It’s a scene that is likely all-too-familiar to the average Salesforce user or admin: you’re trying to complete what seems like a pretty simple task like doing a data load or updating some records. Then BAM! You’re hit with a big, nasty error that looks something like this:
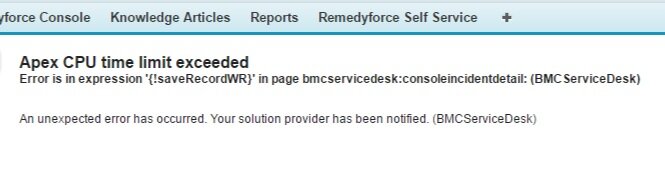
Apex CPU time limit exceeded: a Salesforce admin’s worst nightmare.
This frustratingly opaque message is sadly becoming more and more common in Salesforce orgs.
The good news is that, while it won’t be a walk in the park to fully resolve this issue and might earn you a grey hair or two, there are a number of steps you can readily take to reduce the issue going forward.
In this article we’ll talk more about what causes Apex CPU timeout errors in Salesforce and what you can do to fix them.
What causes Apex CPU Timeout errors?
While it’s possible for these errors to be caused by a number of different things, the most common culprit is process builder. More specifically, many process builders running concurrently on the same object and/or updating related objects.
To understand why this is an issue, consider the following example:
- Generic Company uses a custom object to track partner involvement on opportunities. A variety of changes on the opportunity can trigger changes on the partner record and vice versa. For example, the Opportunity Amount influences the quota that the partner receives, stored in the Quota field on the partner record.
- When a partner record is associated with an opportunity, both the opportunity and partner record process builders are triggered. These processes then trigger one another to run again by updating fields such as Amount. This leads to a vicious cycle where, instead of a neat, finite set of changes, multiple process builders run in conflict with each other and, as a result, exceed CPU limits.
If you’re handy with the developer console, you can actually see this in action under the Execution Overview. The Execution Overview allows you to visualise what is happening when a process fires, as shown below.
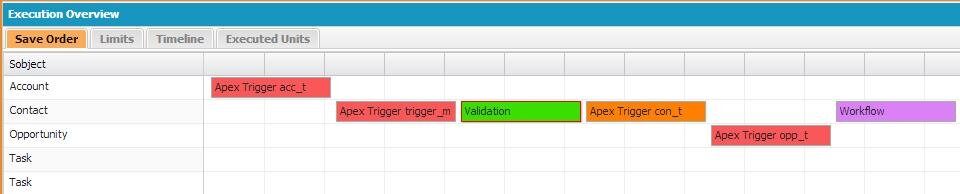
With poorly architectured orgs, you’ll often see the original process builder kicking off, triggering another process builder, which then triggers the original process builder again and so on and so forth. The stuff of nightmares.
Why does this happen?
On a basic level, process builders get into this state because:
- Nobody has laid out how processes should be designed within your Salesforce instance
- They’re just so quick and easy to use! What does one more process builder hurt?
Point 2 is a blessing and a curse: process builders have gained traction because they are quick and simple to set up, even for junior admins. However, users are given very little guidance on how they should be structured despite their detrimental effects when implemented suboptimally.
There is also some indication that process builder simply wasn’t built for the purposes it’s ended up being used for. This is hinted at in Salesforce’s recent recommendations to abandon process builder in place of flows except in scenarios where flow does not have the necessary feature (note: article on this upcoming).
So, how do I fix this?
While there isn’t a quick fix, there are a number of fairly simple strategies you can employ to minimise the issue.
Decide on your architecture going forward
There’s really no point going through the process of streamlining your automations if the problem is just going to recur in a few months. For this reason, you’ll want to start by getting all your admins and devs into one room and hashing out what architecture you will follow to:
- Consolidate your processes
- Build and maintain your processes going forward
There are plenty of ways to do this, but our preferred architecture at the moment is this one outlined by Alex Peattie.
Consolidate existing process builders and workflow rules
This part of the process can be intimidating. We're currently working on a part two of this article that provide more specifics on how to approach the actual process of documenting and consolidating your processes. Watch this space!
Now that you know how you want things to look going forward, you can start optimising your current processes. In general, the fewer processes you have running on a given object, the better. This is because it reduces the risk of re-triggering Salesforce’s order of operations from the beginning.
Working in (ideally) a partial or full sandbox, start by categorising everything your process builders do. From here, you should be able to eliminate outdated actions that are no longer relevant and start to group similar actions together. For example, you might find that you can merge five separate nodes that run when an opportunity moves into “Closed Won” into one set of actions.
Repeat until you have grouped your automations into as few process builders as possible and as few nodes as possible. Make sure to test thoroughly before releasing!
Minimise use of Evaluate The Next Criteria
Dan Appleman estimates in his article around process builder execution speed that each process builder node takes approximately 75-100ms per criteria against 200 records. In a scenario where you have multiple process builders, triggers and workflow rules running against the same object or across objects, this adds up. For this reason, it’s critical to keep the number of criteria evaluated to a minimum.
One of the easiest ways to do this is to be very judicious about using the Evaluate The Next Criteria option in your process builders. Having been through the exercise of documenting what your process builders are doing, you should be able to identify certain actions that only occur under specific criteria or which are mutually exclusive.
Make sure to structure your process builder in a way that won’t prevent necessary actions from running in the case of your process builder hitting one of the criteria that end the process.
Restrict node entry criteria
When documenting your processes, ask yourself whether the criteria that trigger each action are optimally restrictive. For example, you might have a process that sets a custom field Commission Amount to a set percentage of the Amount field on the Opportunity. Realistically, this criteria only needs to run when the Amount field is changed.
Simple changes like making sure a node is only executed when a field value is actually modified as opposed to just present can significantly cut down on the number of actions run by a given process builder.
Start with an exclusion node
An exclusion node is a node at the beginning of your process builder that basically says if none of the changes are made that would trigger subsequent updates in this process builder have been made, stop the process now and don’t evaluate any further criteria.
This is useful because, unlike workflow rules and rule, process builder is built to cycle through all of your nodes one after another to determine whether any changes need to be made. As we have seen earlier in this article, this is very time-consuming! Preventing process builders from having to run through all their nodes to see which actions should be run is a big time saver.
Let’s say you have a lead process builder. The actions in your process builder are set to run if the Country field is populated or changed, if the Owner is changed or if the NumberOfEmployees field is changed. Under normal circumstances, this process builder will need to evaluate each node in turn to see if any of these conditions are true. With an initial negative node in place, however, you can skip all that if none of the conditions are met.
For the example above, your exclusion node may look something like this:
NOT(ISCHANGED(Country)) &&
NOT(ISCHANGED(OwnerId)) &&
NOT(ISCHANGED(NumberOfEmployees))
Knowing that none of the subsequent criteria will be met, your process builder can safely end its operations immediately.
Eradicate infinite loops
Infinite loops are processes that trigger other processes that then trigger the first process again until the transaction times out. To identify these, look out for:
- Cross-object updates - e.g. Account to Contact and then Contact back to Account
- Dependent field updates - e.g. Field 1 is updated, which triggers an update to Field 2, which affects Field 1 again.
These recursive actions are a killer and will need to be rethought entirely so that all updates occur smoothly and linearly.
Sadly, I’m not aware of a quick and easy way to identifying such transactions, other than running transactions that seem to commonly time out in the debug console. If anyone is aware of a better way to find them, please let us know!
Move immediate actions to scheduled actions
If you have some actions that don’t need to occur immediately, consider moving them to scheduled actions so that they can be executed asynchronously. Just make sure that nothing that occurs in the interim can end up cancelling out a scheduled action.
It’s fixed! How do we prevent this happening again?
It’s a big achievement to have got your processes back into a good state, so congratulations on getting this far! As anyone who’s been through the process can attest, it’s something you only want to do once, so how do you go about keeping your org clean and running smoothly?
Here are some points to consider:
- Make sure all admins and devs are trained on your new architecture and all changes go through this defined process
- Document all changes thoroughly in a central repository
- Run regular health checks on your org to catch and correct any deviations from the defined architecture
Summary
In summary, if you start seeing Apex CPU timeout errors, check your process builders. If you see any of the following, these are areas you’ll want to optimise:
- Large number of process builders or workflow rules on the same object
- Large number of cross-object operations
- Frequent usage of “Evaluate The Next Criteria”
- Loose criteria to execute actions
Tackle the issues in the following order:
- Define an architecture from process builders going forward - our preferred method is this one by Alex Peattie
- Document the current state of your process builders - you can download a sample template here
- Using the template, work through your process builders and map them to your new framework, merging as many processes as possible
- Where possible, remove outdated actions and convert custom formulae to drag and drag criteria or updates
- Change as many actions as possible to not evaluate the next criteria
- Include negative criteria to prevent process builders running unnecessarily
- Reduce the number of cross-object actions as much as possible
- Move performance-heavy but non-urgent actions to scheduled actions
We hope this article was helpful! If you have any follow-up questions or are interested in Candybox taking a lot at your Salesforce org to determine what changes you could make to improve performance, we’d be happy to hear from you.